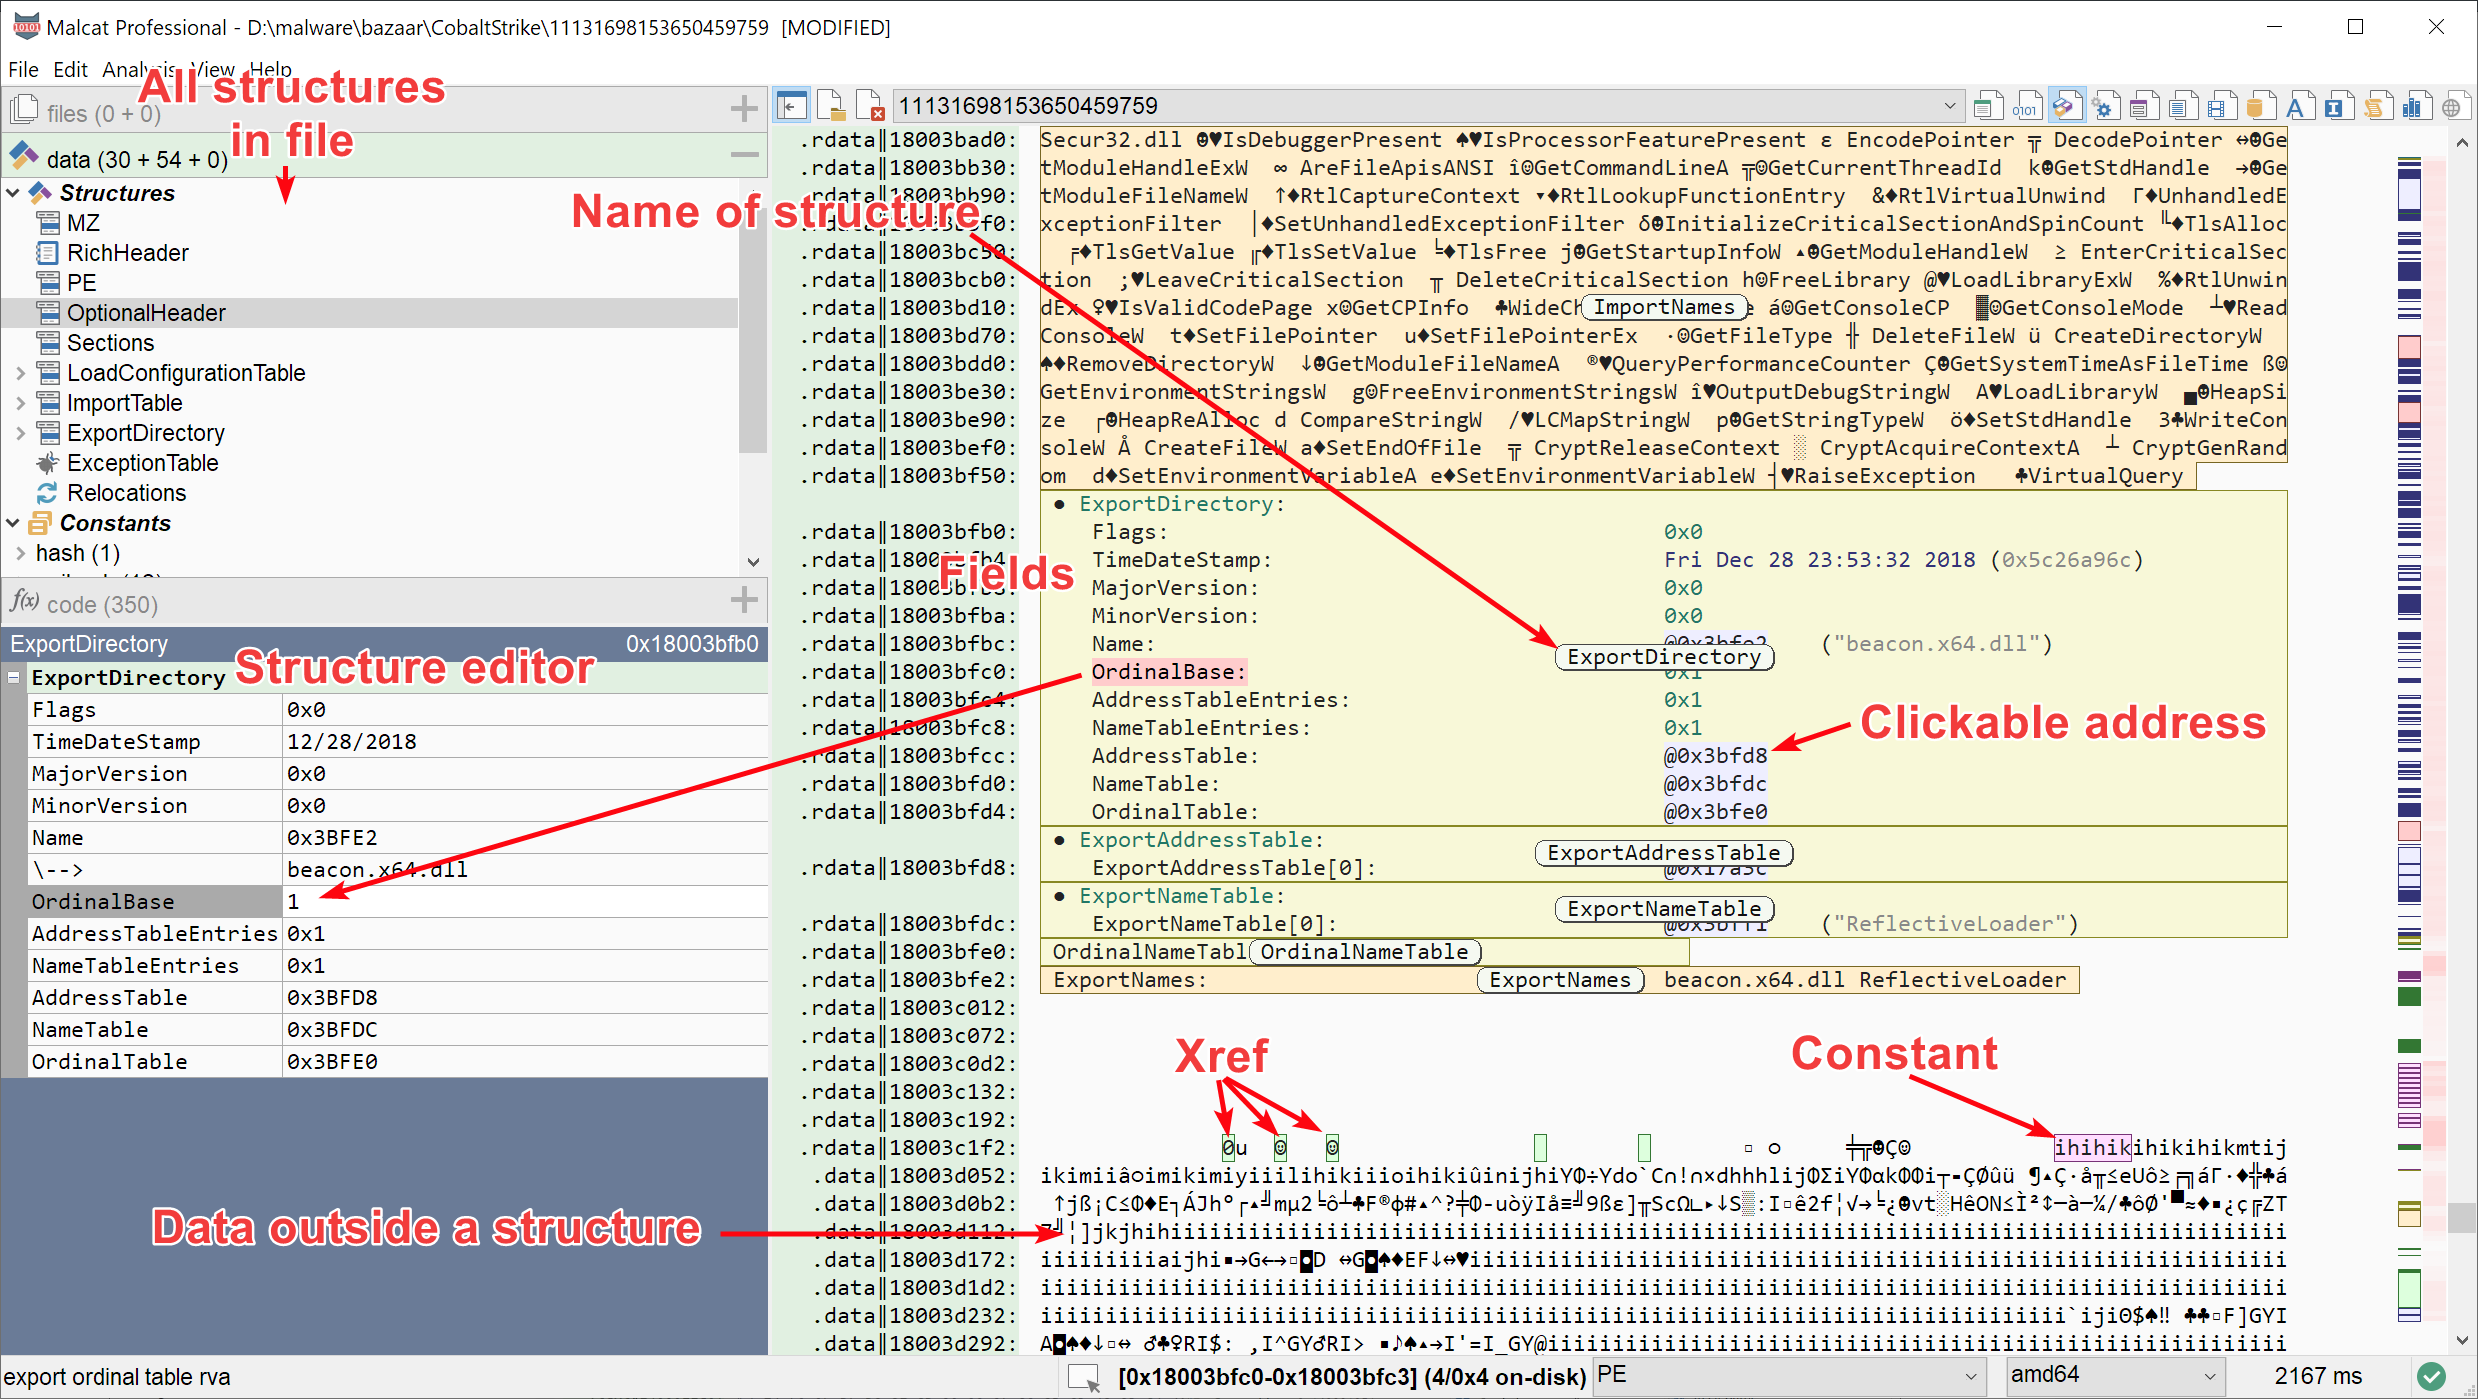
Structure/text view
The structure/text view is similar to the Hexadecimal view and is accessed by pressing F2 twice (unless the structure view is configured to be the first data view in in ).
The structure/text view displays an expanded view of all structures found inside the file. For all the bytes of the file which are not part of any identifed structure, a byte-by-byte textual representation is used instead. So this view is a bit higher-level than the Hexadecimal view and can be used to:
Explore structures
Browse strings and other ascii data
In this page, we will describe how the view can be used. If you are already confortable with the Hexadecimal view, .this should be an easy walk.
Viewing
Charsets
The structure/text view displays a textual representation of each byte of the file (for bytes outside a known structure). Since binary data is no unicode data, which letter/symbol/glyph gets associated to which byte is kind of a matter of taste. The ascii range (i.e. bytes in [32, 126]) is pretty well defined and accepted accross the globe, but for the other bytes you have to use regional preferences known as charsets. Malcat allows you to use one of the following charsets in the structure/text view:
Plain ascii: the charset often used in other hexadecimal editor. Characters outside the ascii range are not printed, which makes visualisation a bit harder
IBM/CP437: this is the character set of the original IBM PC, or DOS mostly used in the US. Each byte get its own unique glyph.
Latin-1/CP850: this is a code page used under DOS in Western Europe. Each byte get its own unique glyph.
Cyrilic/CP866: this is a code page used under DOS and OS/2 in Russia to write Cyrillic scripts. Each byte get its own unique glyph.
Ansi/CP1252: this is a character encoding of the Latin alphabet that was used by default in Microsoft Windows for English and many Romance and Germanic languages. Note that we use the MSDOS extensions for the range [0-32], so that each byte get its own unique glyph.
If you want to change the charset for the data view, you have to go .
Structure preview
By clicking on any highlighted structure or annotation (see Highlighting), you can preview the content of the annotation in the quickview panel (see User interface). Depending on the type of annotation, the quickview can consist for instance of:
a structure editor for structure annotations
a disassembly listing for function annotations
a list of references for cross-reference annotations
… and so forth
Displaying annotations details into the quickview panel (bottom left)
If several annotations are stacked at a given address and you want to display the details of an element which is underneath the top element, you won’t be able to just click on it (it would show only the top-element details). You can either:
right click on the element, locate the annotation type submenu you want and select “Preview xxx”
display only the annotation you want using the Highlighting dialog, then click on it
Note
If you just want to display the data (string/number) under the cursor, you can achieve it using Ctrl+LeftClick (see Data preview).
Highlighting
Most of Malcat’s Analysis engine can be visualized from within the structure view. Each analysis (or annotation) has a color code, which helps identify what the file is made of.
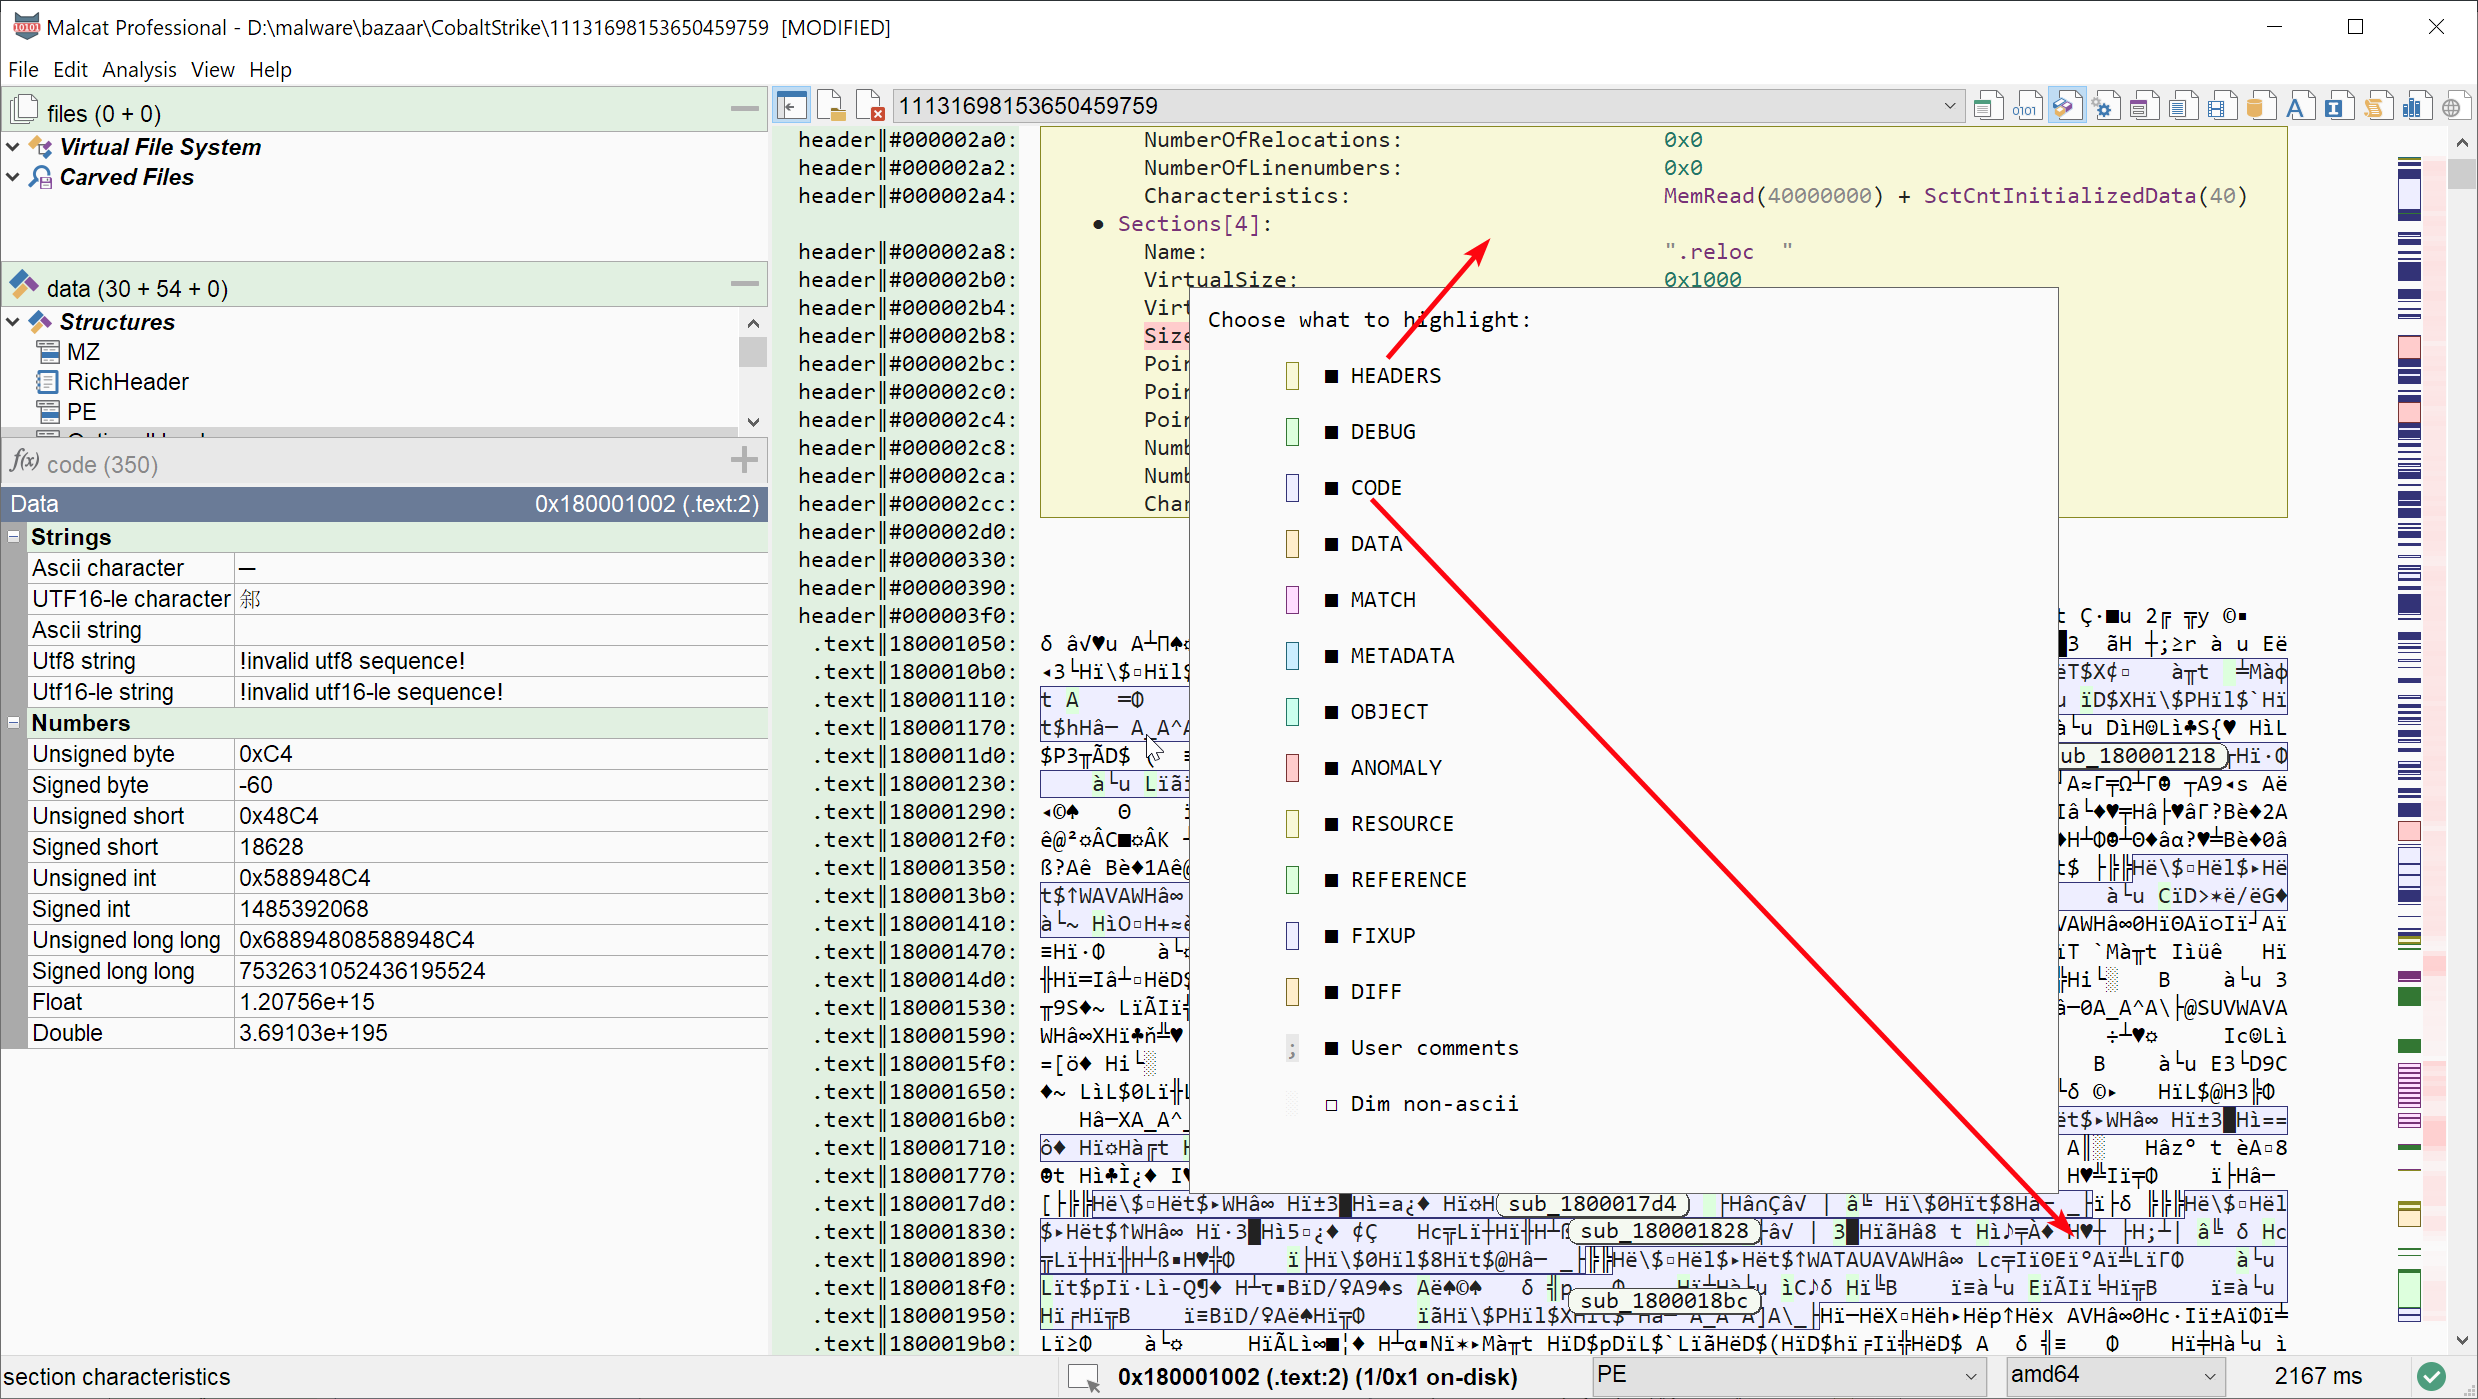
Chosing which annotations to highlight in the structure view
You can easily switch which type of annotation you want to see by pressing (and keeping pressed) Tab. This will up the annotation highlighting dialog, as shown above. Your preferences are saved upon exit.
Note also the last option Dim non-ascii: if selected, non-ascii bytes will be displaye dusing the theme’s color which will make all printable characters stand out. It is a great feature when you are looking for strings, while Editing a Yara rule for instance.
Shortcut |
Action |
|---|---|
Tab (keep pressed) |
Display highlighting dialog |
Shift+Tab |
Highlights/unhighlight all annotations |
Data preview
By clicking on a not-highlighted byte (i.e not in a colored annotation), or pressing Ctrl+LeftClick on a highlighted annotation, you can display some basic information regarding the currently selected byte. In the quickview panel, the selected address will be interpreted using different usual types, like uint8_t, int32_t, double, char*, etc. This is a feature commonly found in hexadecimal editors.
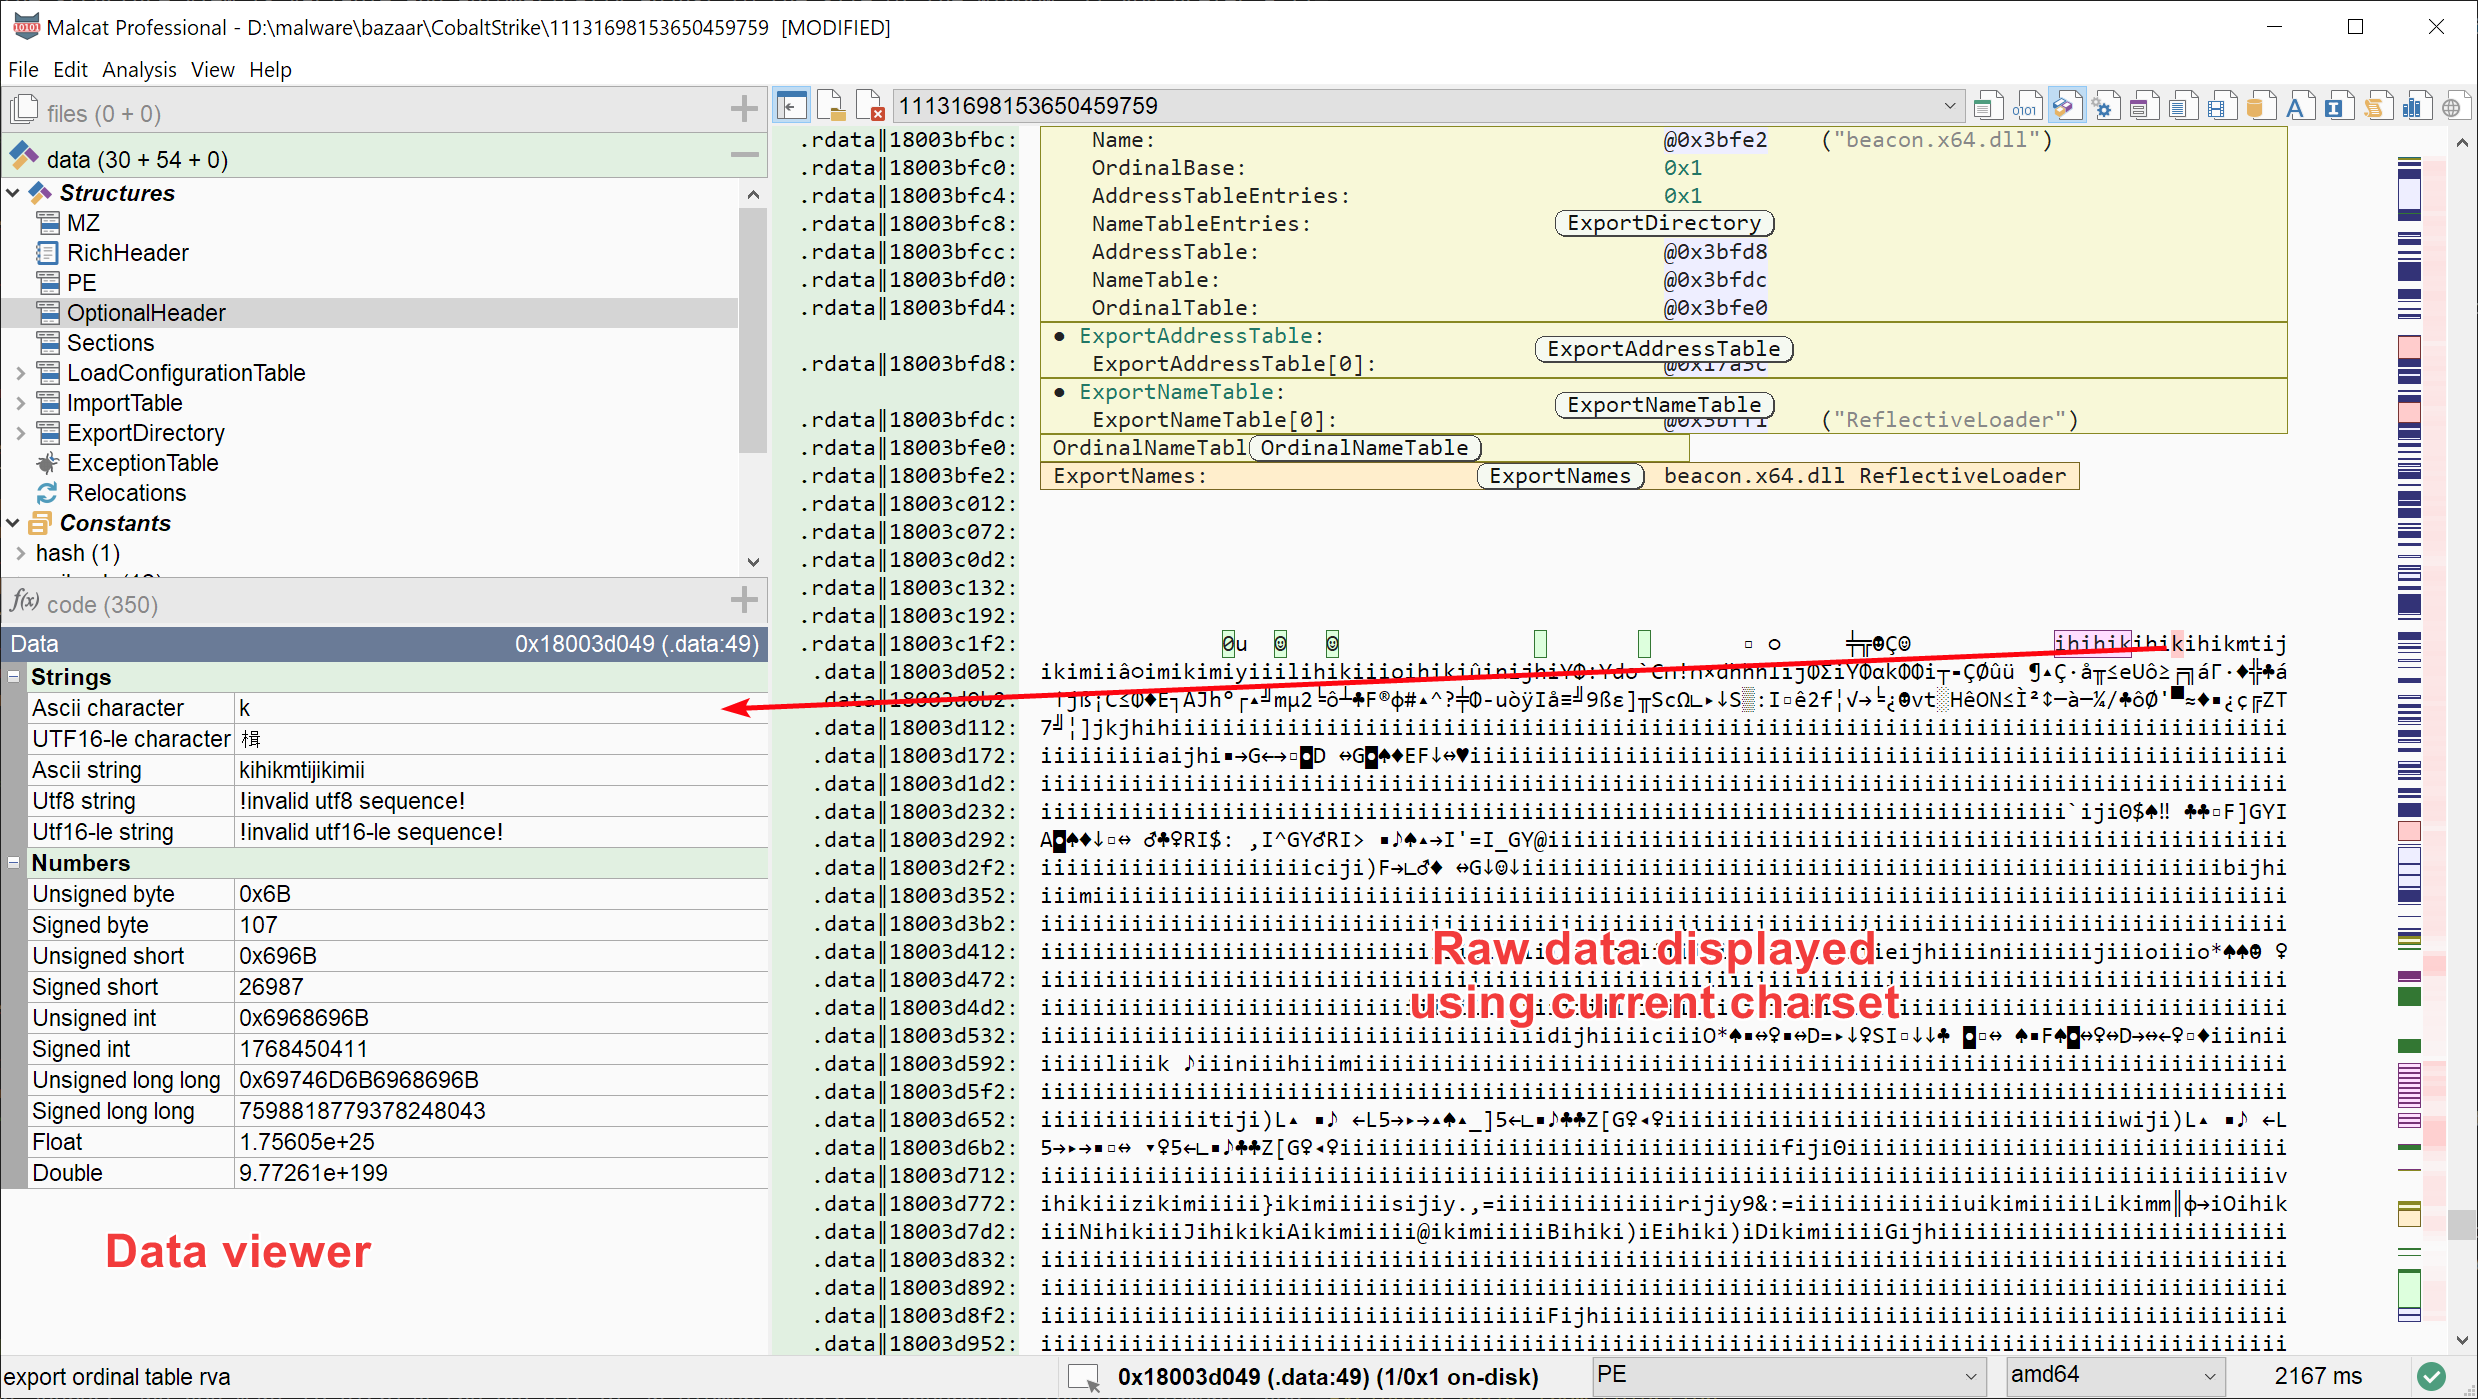
Displaying basic information on selected byte.
Augmented navigation bar
Left of the system scrollbar, the structure view features two augmented navigation bars:
the left-most one represents the identified structures, functions and sub-objects using their corresponding theme colors
the right-most scrollbar displays the entropy of the file using a color shade ranging from the theme’s background color (low entropy) to the theme’s selection color (high entropy)
Note that these scrollbars can be deactivated using the Option dialog:
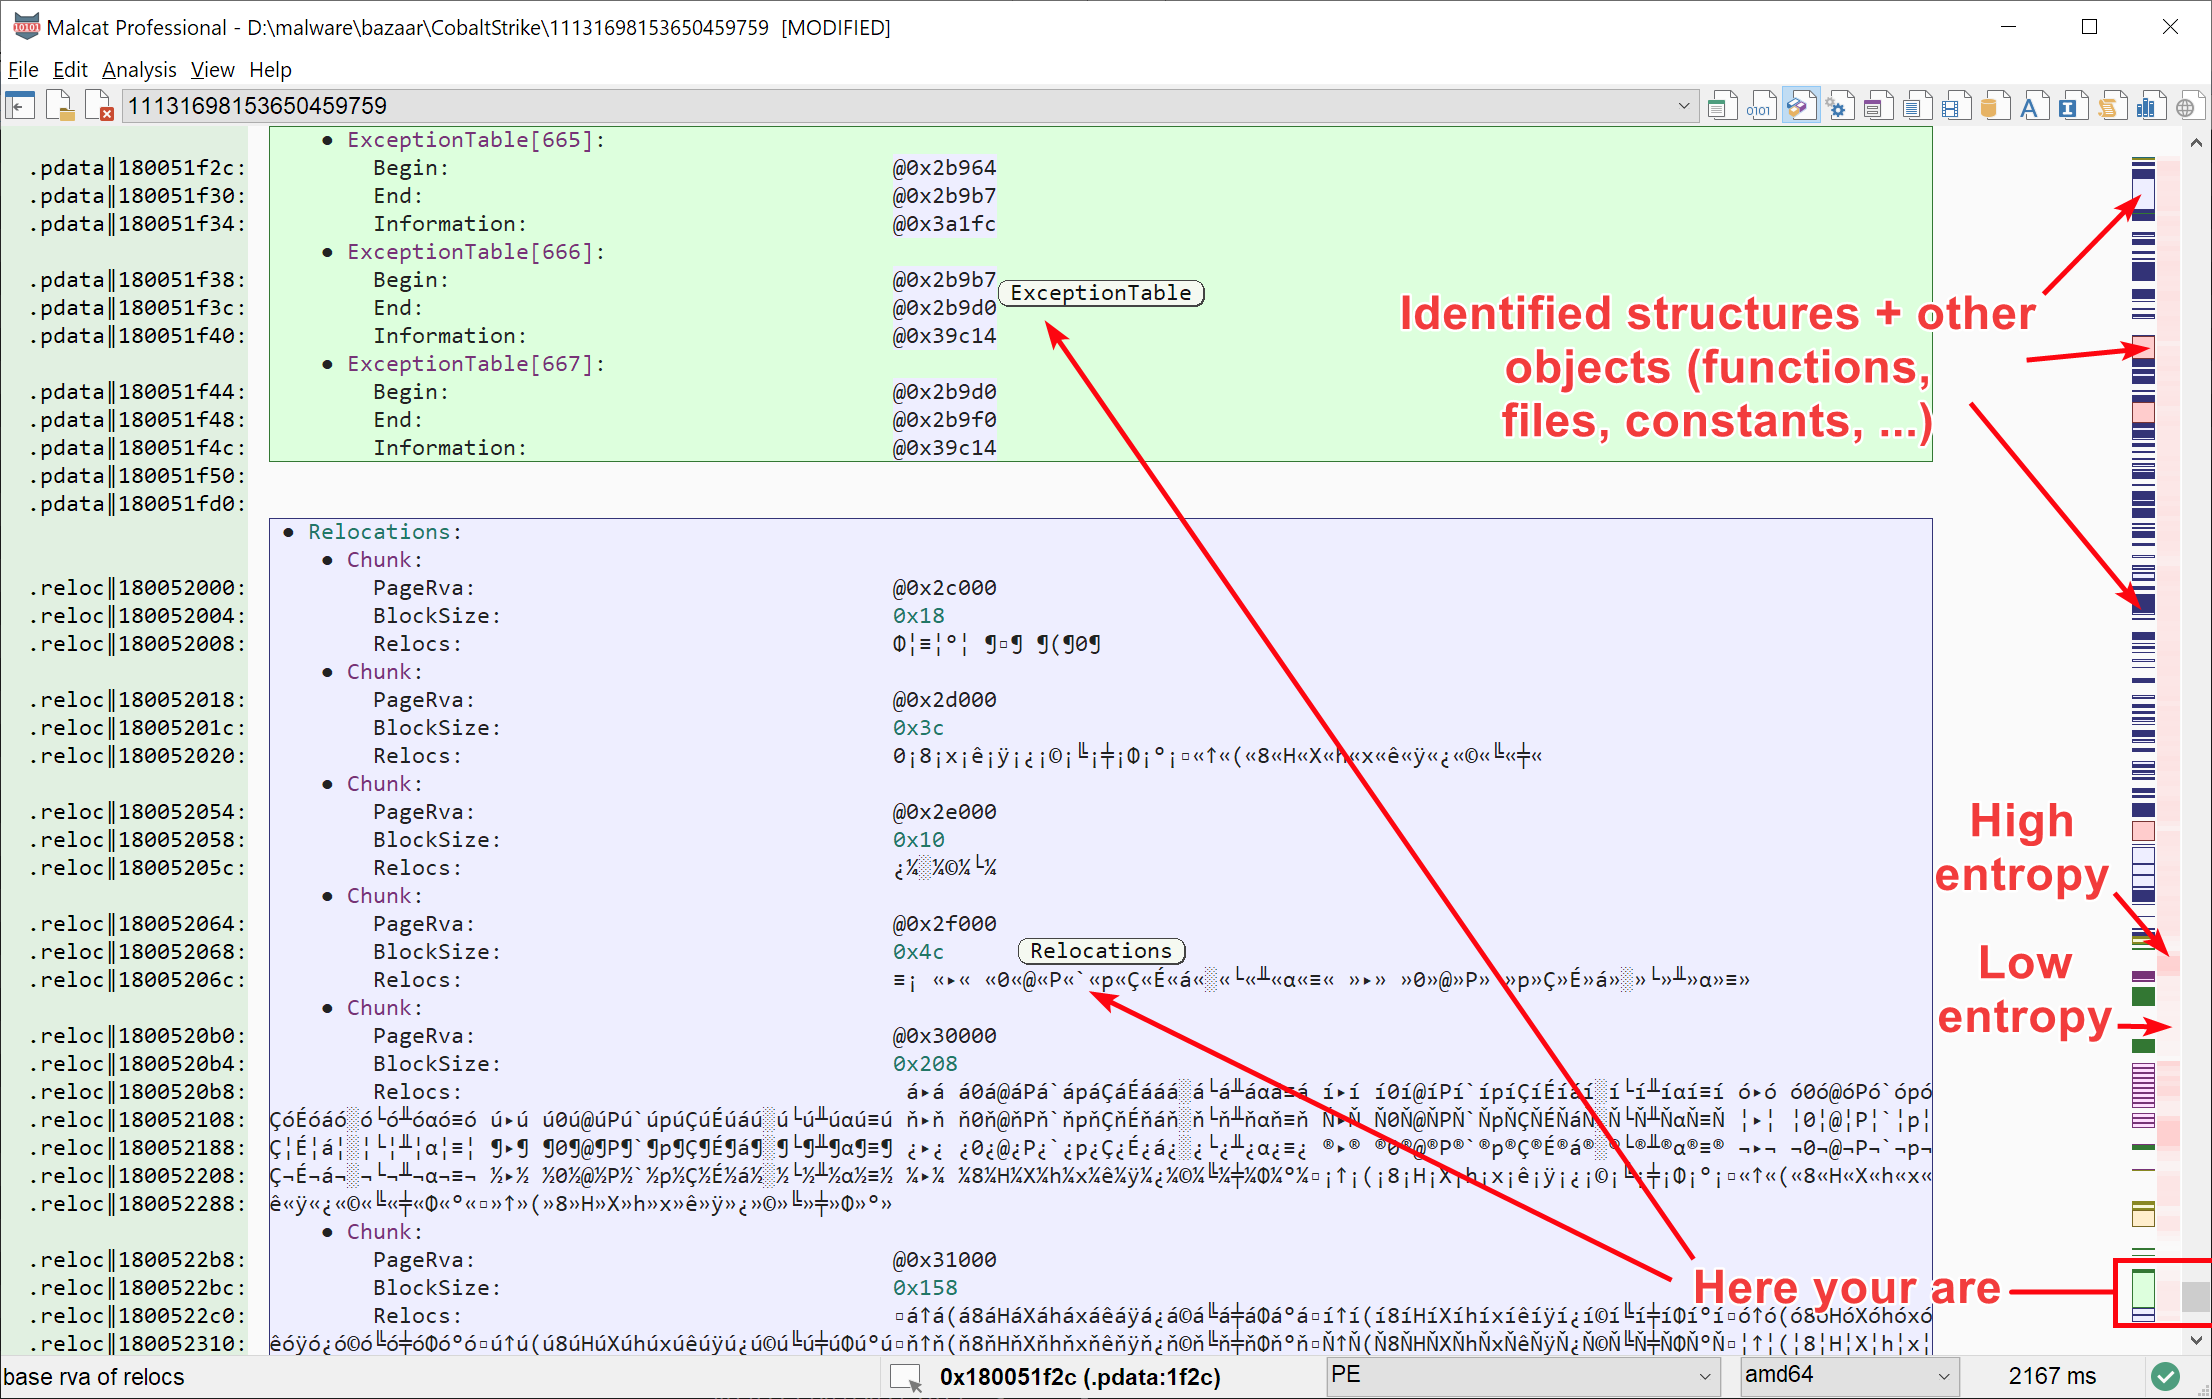
Making sense of the augmented scroll bar
These augmented navigation work in conjunction with the system scrollbar. It is thus very easy to scroll to an interesting part of the file using the scrollbar.
Editing
Editing bytes
In order to modify the file content, you need first to enter edit mode. This can be done several ways:
By double-clicking a byte in the view, outside of a structure
By pressing the Insert key. This will start editing at:
the selected byte address, if a single byte is selected in the view
the first address displayed in the view otherwise
By right-clicking a byte and choosing in the context menu
Once you are in edit mode, you can edit the file either by entering ascii characters. You can also paste previously copied bytes using Ctrl+V. You can leave edit mode by pressing Esc or Insert.
Note
Once edited, the file will be in MODIFIED state (visible in the title bar). You will need to hit Ctrl+S in order to save your changes.
Shortcut |
Action |
|---|---|
Insert |
Enter/leave edit mode |
Double-click |
Enter edit mode |
Esc |
Leave edit mode |
Ctrl+Z |
Undo last edit |
Ctrl+Y |
Redo last edit |
Ctrl+S |
Save the file |
Editing structures
For identified structures, Malcat offers an easy way to edit the fields of the structure. By clicking on any highlighted structure or one of its field in the structure view, you will open the Structure preview in the quickview panel. There, all fields of the structure can be edited using a appropriate editor:
string can be modifed via a text box (new strings size must be less or equal than the old one)
numbers can be edited via a text box too. Lower and upper limits are enforced, depending on the integer type
enums get a combobox with all known enum values populated
bit fields display checkboxes for each bit
date fields open a calendar
etc, etc.
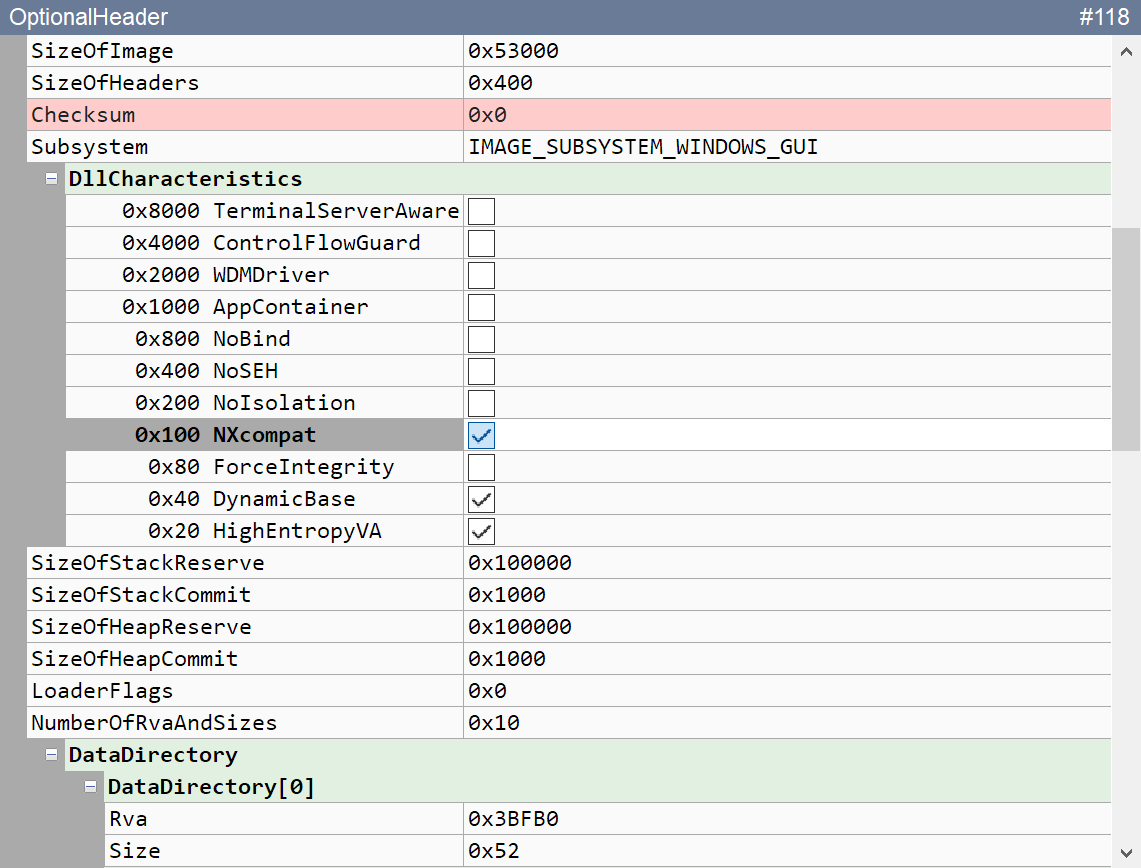
Editing structure fields in the structure quickview panel
Once a value has been modified using one of the controls, the corresponding bytes are written to the file. You can undo your changes using Ctrl+Z like a normal edit.
Note
For some of the controls, the focus needs to change to another window/control before the edited value is validated and written to the file.
Insert / remove bytes
In addition to modifying existing bytes, you can insert or remove an arbitrary amount of bytes in the file. This can be done using context menus:
To insert bytes (the file will grow), right-click on a single byte and chose . A dialog will pop-up where you can chose the amount of bytes to insert. New bytes will be insert before the selected byte and will be filled with the value
INSERTEDrepeated as neededTo delete bytes (the file will shrink), first select the range you want to delete, right-click on the selection and chose
Both insert and delete operations behave like any other edit operation: the file will be in MODIFIED state and you can undo/redo the operation.
Note
By default, the file will be reanalyzed after every insert or delete operation. This is done because the analysis is most likely not relevant anymore, and in order to avoid some GUI quirks regarding scrollbars noz keeping of file size changes. If it bothers you, you can deactivate it in
Apply a custom type
You can also apply /analysis/types to data outside of any identified structure. This is useful in two cases:
for some reason, the File parsers missed the structure at a given location
your are exploring an unknown file type and are trying to make sense of its data
To apply a custom type, just use the context menu on any byte outside of an identified structure: . The dialog shown below will pop up:
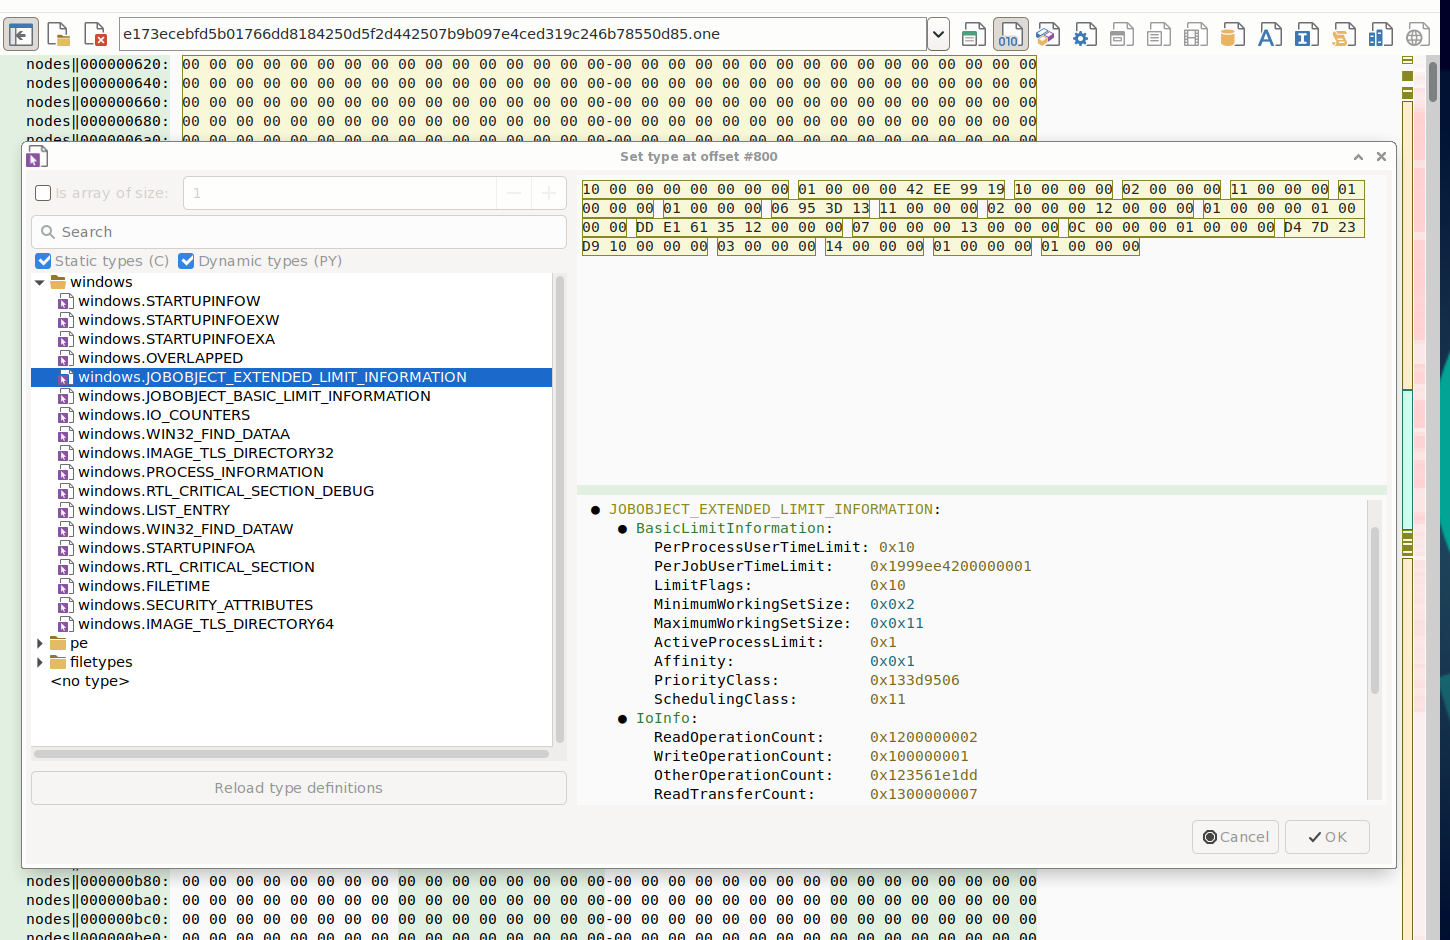
Apply a custom type to raw data
Using this dialog, you can chose and preview two sort of structure types:
dynamic types are types defined in any of Malcat’s File parsers
static types are C-like structures defined in
data/types(cf. newtypes)
After finding the type of your choice, click on OK and a user type structure will be created at the chosen location. User-defined types are saved into the Malcat project file, and will thus be shown if you close and reopen the file later. Like any user edit, this operation can be undone/redone via the usual shortcuts.
Note
Some of the dynamic types found in Malcat’s File parsers will generate errors when chosen in this dialog. Indeed, Malcat’s File parsers structures are defined in python, and some of them make use of global variables / context defined in the parser, which won’t be available at this point.
Add a comment
Using the context menu on any byte, you can add user-defined comments. Comments can be multi-line and are saved within Malcat project file. If you want to see comments, make sure that you did select User comments in the highlighting dialog (see Highlighting).
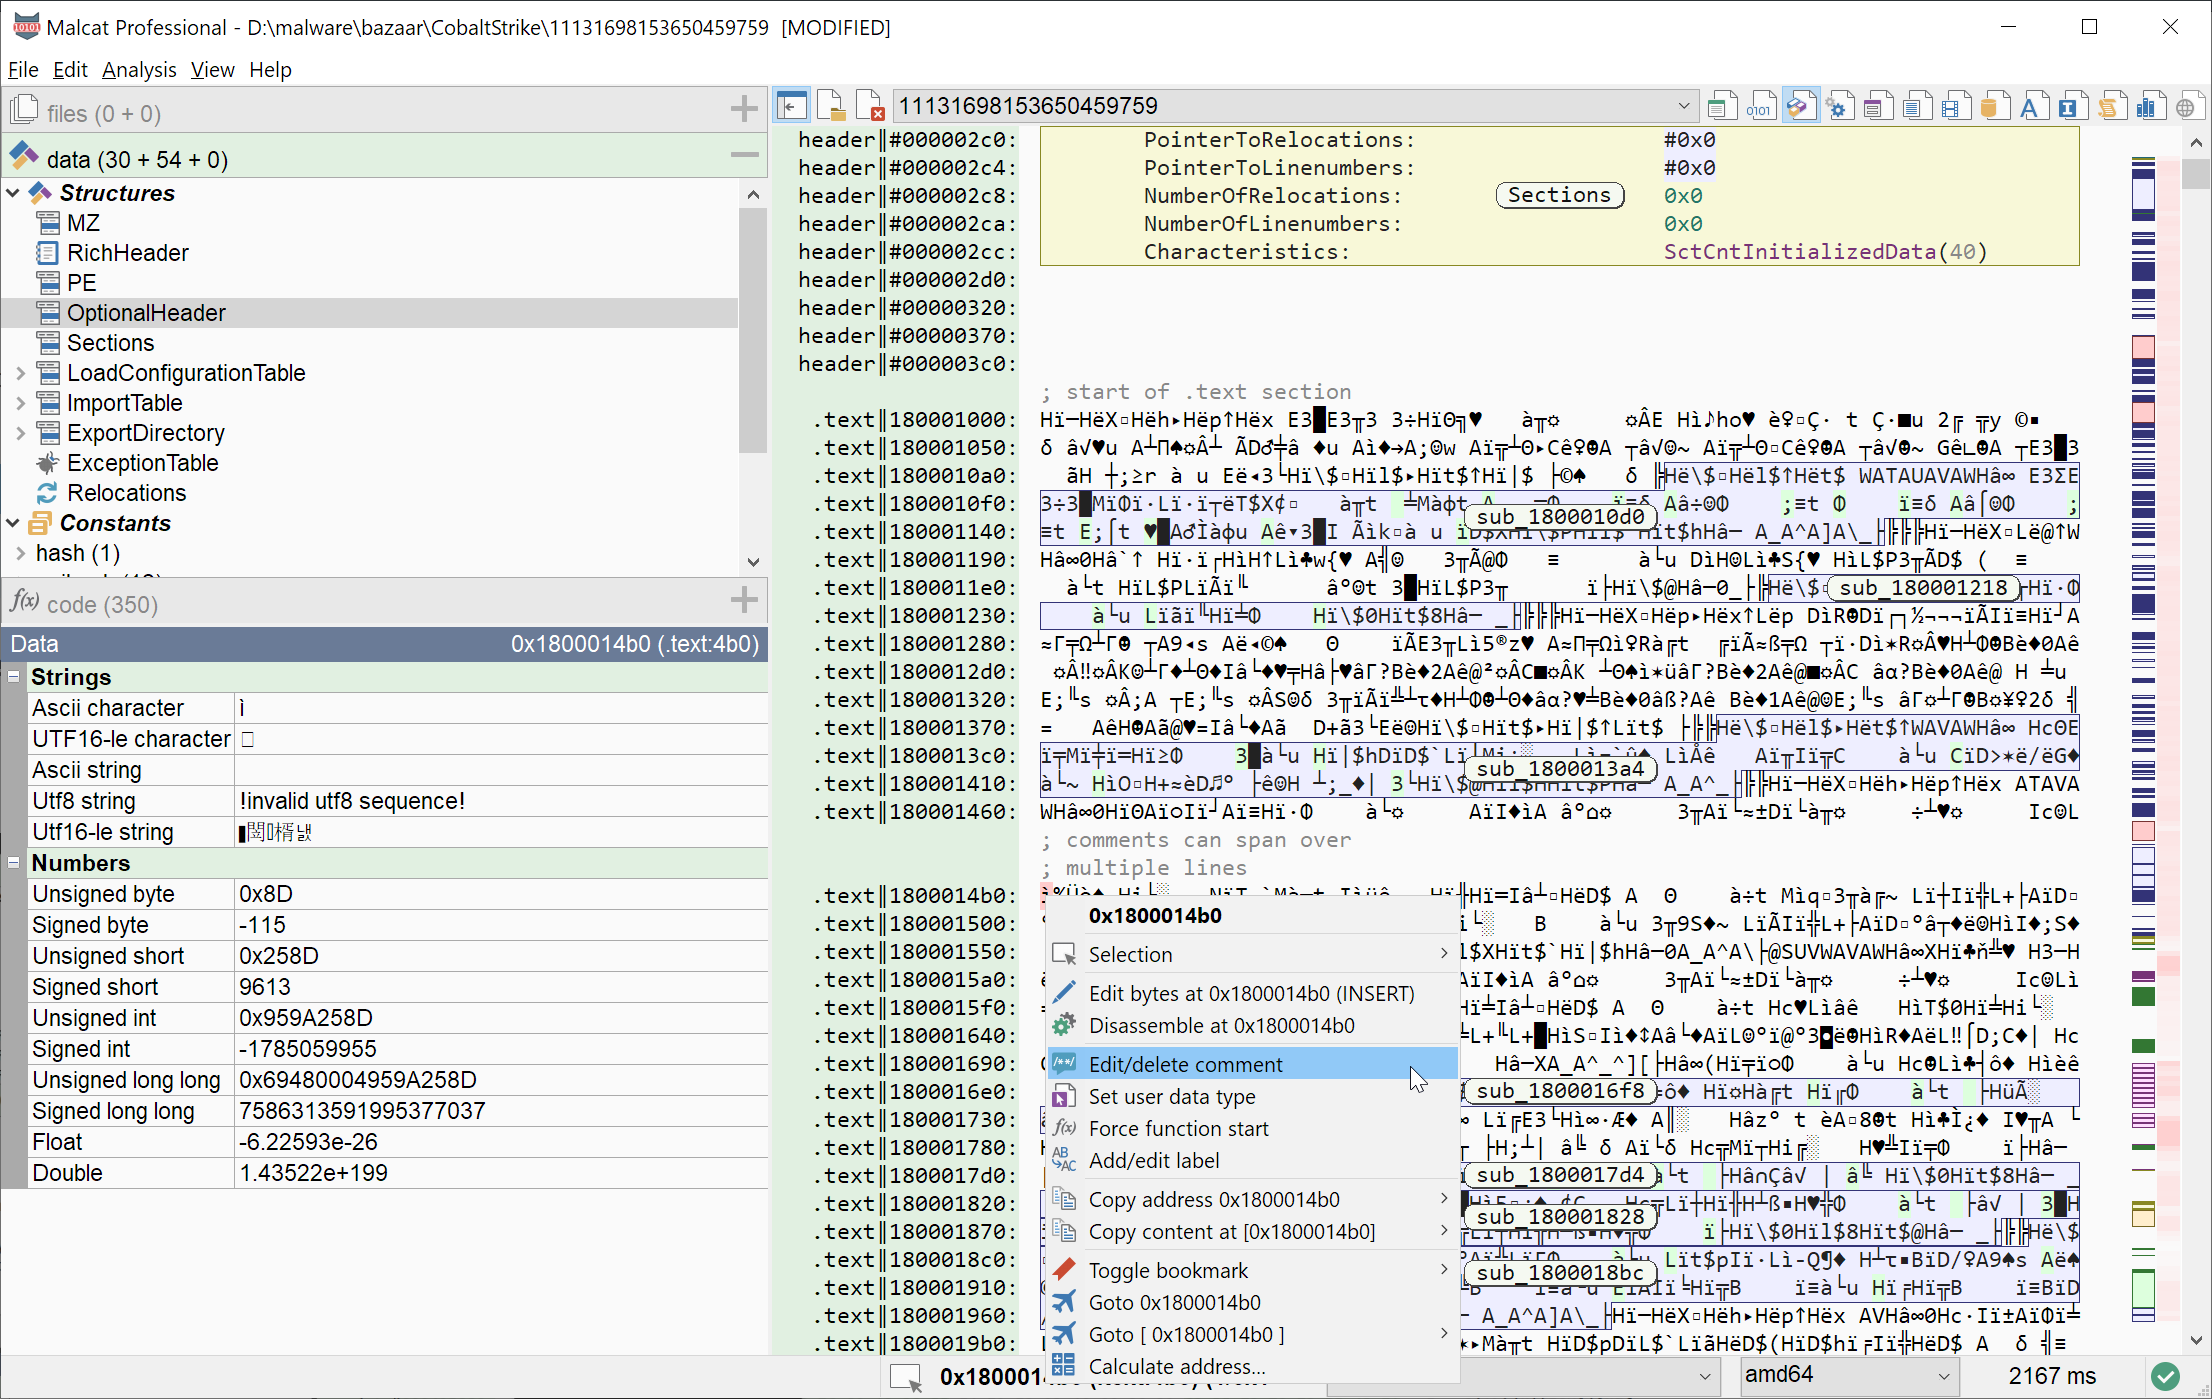
Adding user comments
Note that like any user edit, this operation can be undone/redone via the usual shortcuts.
Shortcut |
Action |
|---|---|
m or M |
Goto next/previous user coMment |
Highlight/annotate a region
Using the context menu on any selected region, you can highlight any given region. See this as user comments, but on a data range instead of a single address. A user annotation is defined by:
a title
a category + color (see Highlighting)
a free-form text note
Annotated/highlighted regions are saved within Malcat project file. If you want to see them in this view, make sure that you did select the corresponding category in the highlighting dialog (see Highlighting).
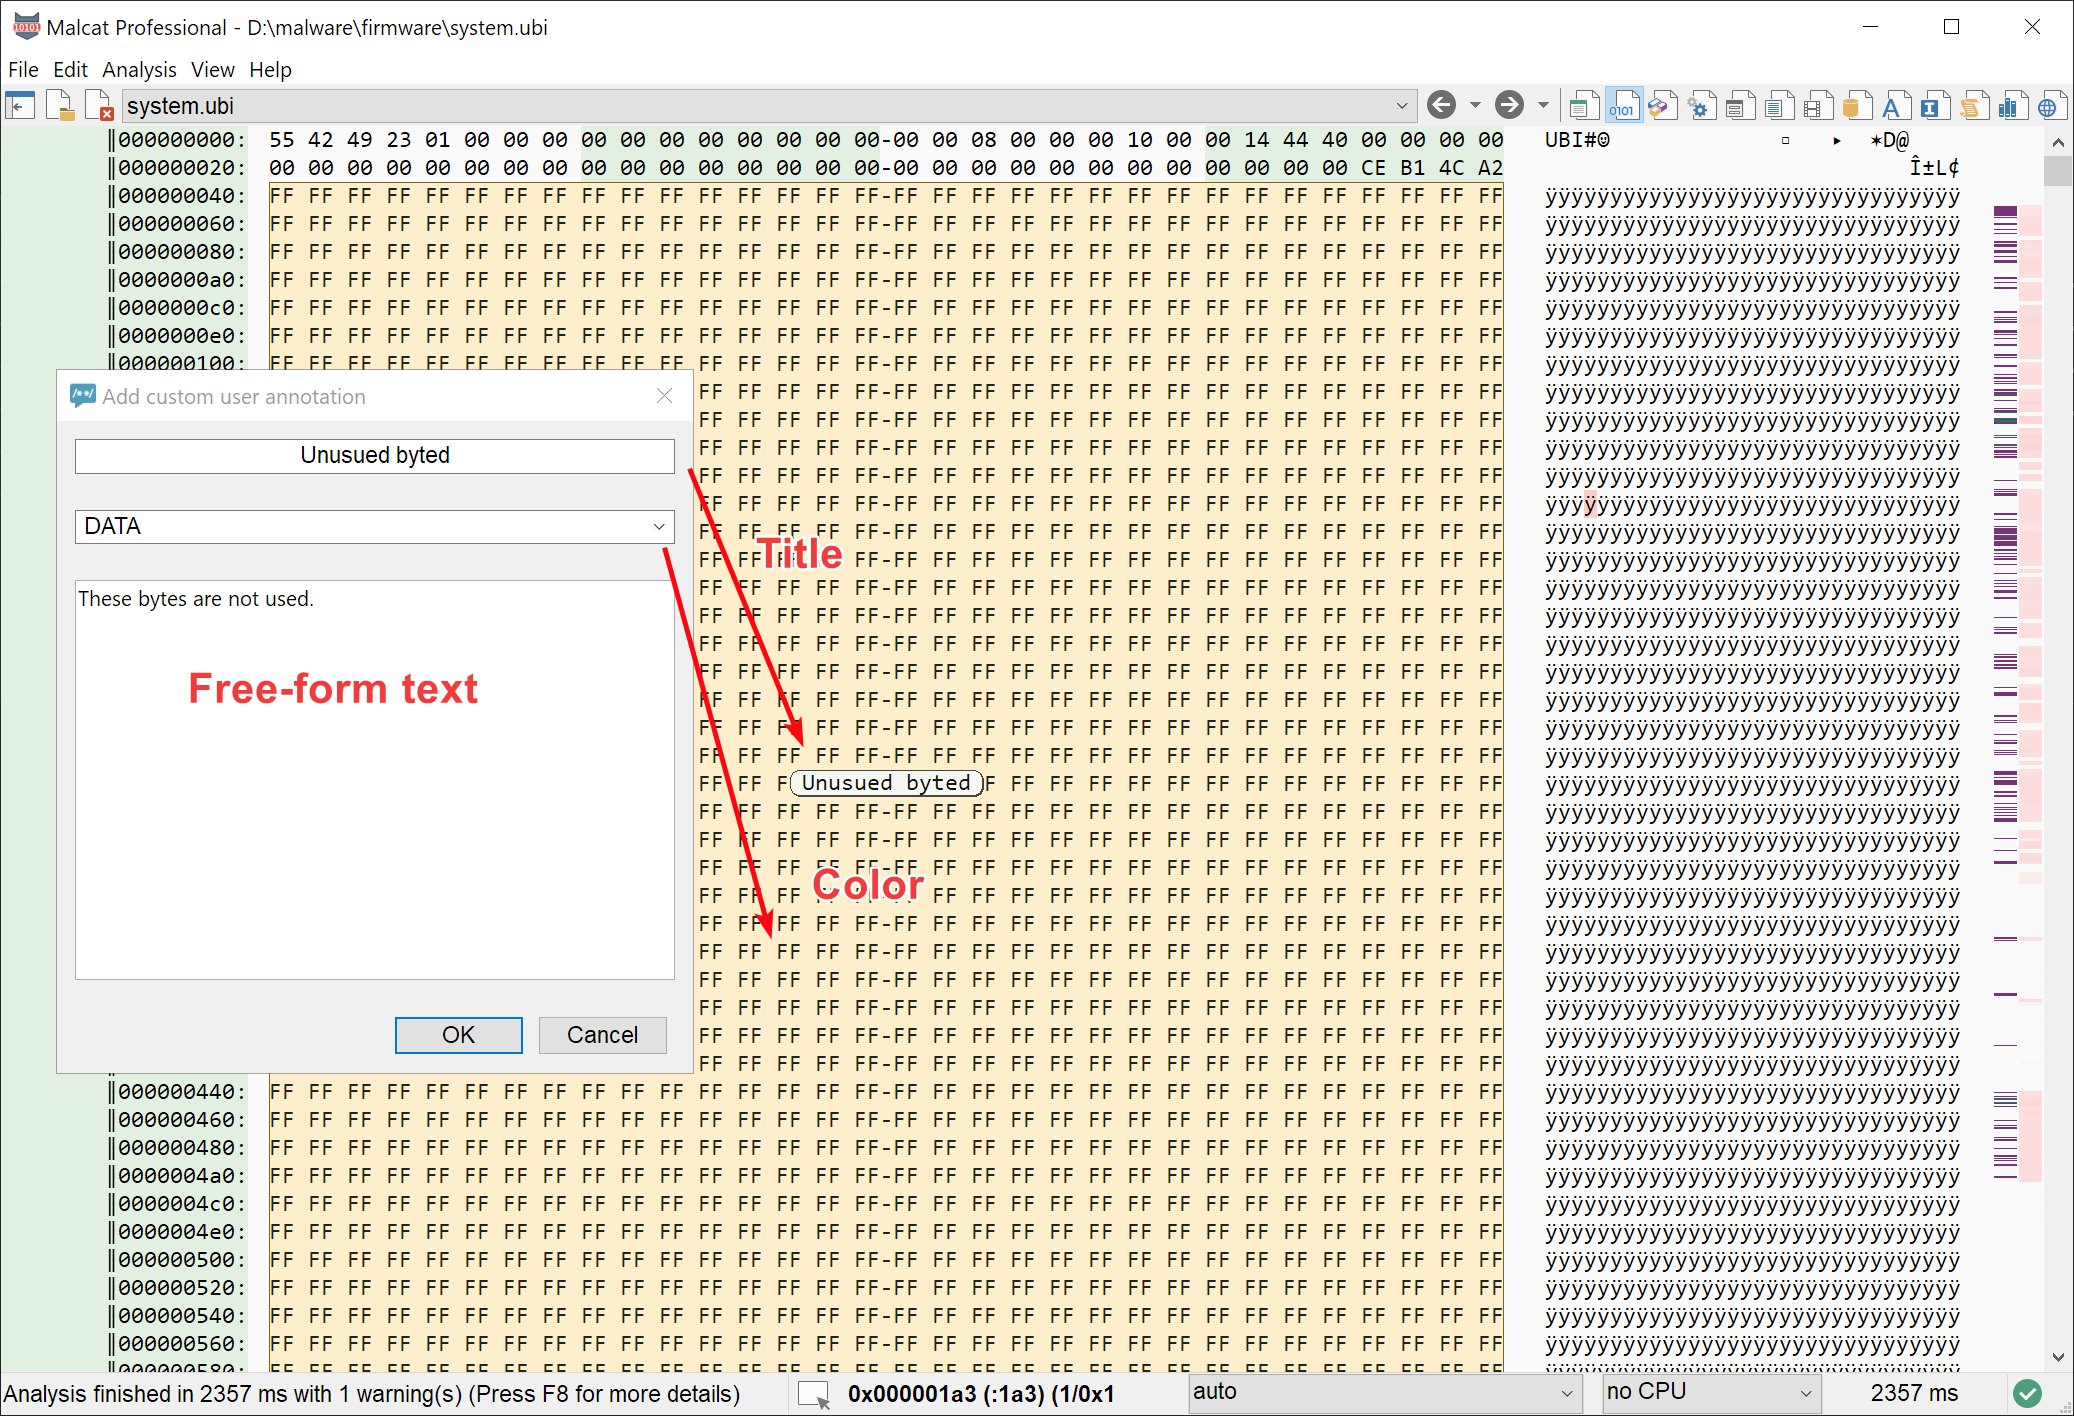
Highlighting user regions
Note that like any user edit, this operation can be undone/redone via the usual shortcuts.
Shortcut |
Action |
|---|---|
a or A |
Goto next/previous user Annotation |
Selecting and other operations
Selecting
Using the mouse
The easiest way to select bytes in the hexadecimal view is to keep the left mouse button pressed in either the hexadecimal or the textual column and move the mouse accordingly. Selecting bytes in one column automatically selects them in the other column (and in the other views as well, selection is global).
If you want to select a range of byte that is bigger that the current displayed range, you can set the selection in two steps. First select the first byte or nibble that needs to be selected using LeftClick. Then, go to the last byte that needs to be selected and press Shift+LeftClick. This will set the selection accordingly.
Excluding bytes from selection
A selection range can have some of its bytes excluded from the selection. To exclude a fiel range from the selection, just select it Using the mouse while holding the Ctrl key. This is currently useful in the following scenarios, and will be even more useful in the future:
When adding bytes to a yara rule pattern: excluded bytes/nibbles are replaced by jokers: ??
When searching for the currently selected pattern ( or : excluded bytes will be excluded from the search pattern
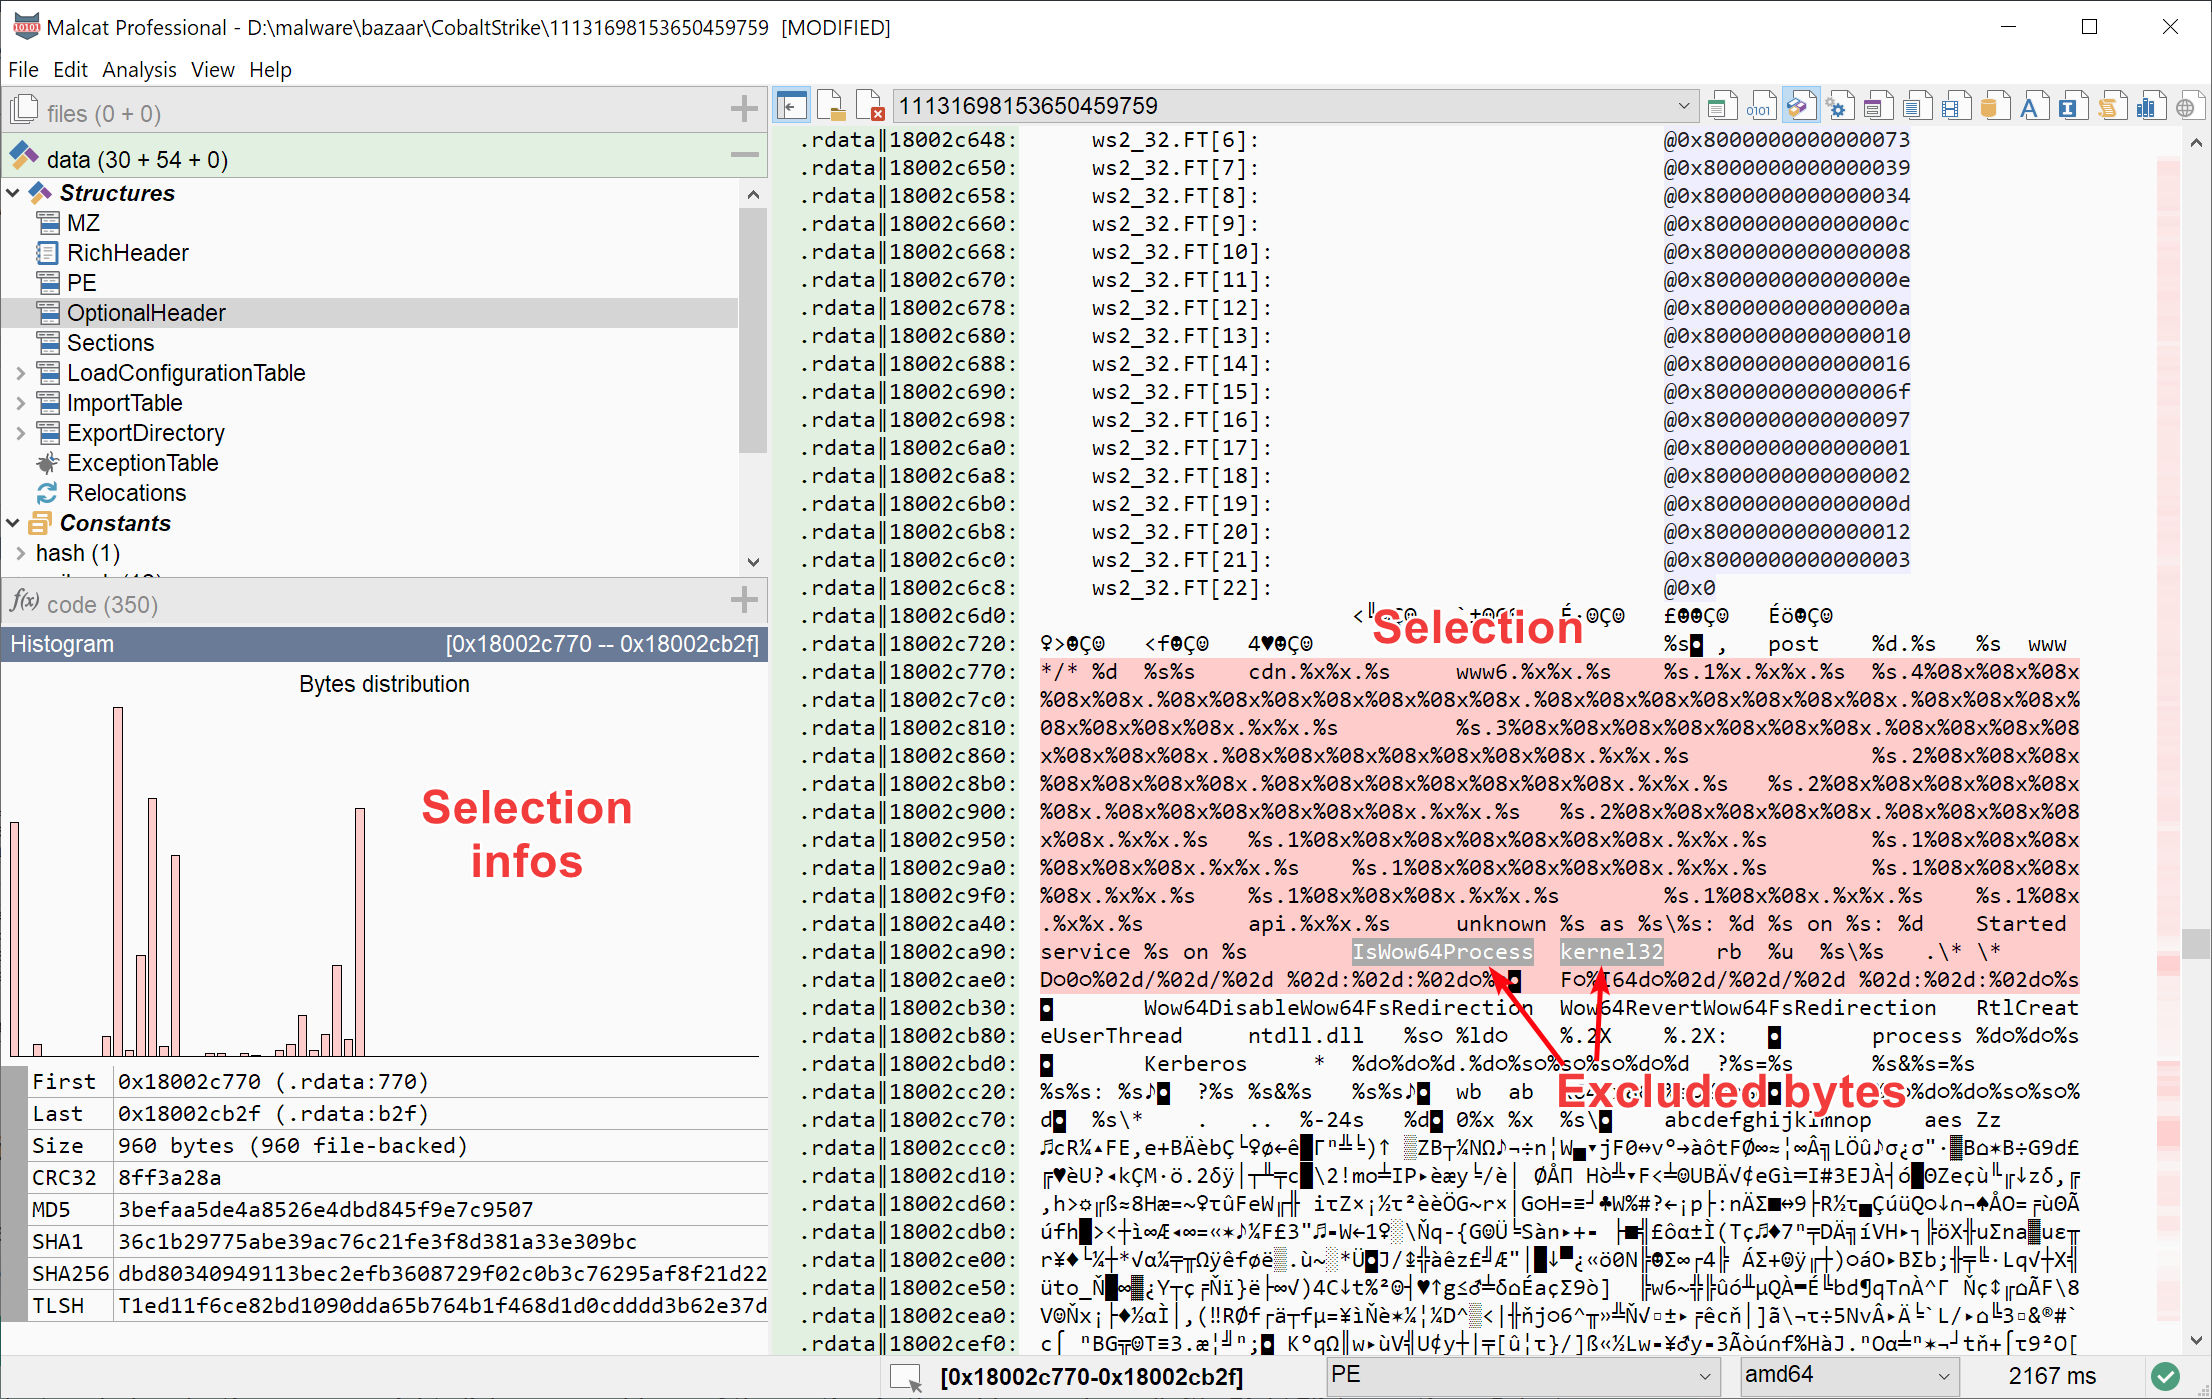
Selecting bytes
Select annotations
If you need to select a complete annotation (e.g. a structure, a function), you can always use the context menu of said annotation . Note that the annotation needs to be visible for the context menu to appear.
Tip
If you need to select a whole selection, you can right click on any address of the section in the address column (left):
Shortcuts
Shortcut |
Action |
|---|---|
LeftClick (keep pressed) |
Mouse select |
LeftClick |
Select byte/nibble and set start of selection |
Shift+LeftClick |
Set end of selection |
Ctrl+LeftClick |
Exclude byte/nibble and set start of exclusion pattern |
Shift+Ctrl+LeftClick |
Set end of exclusion pattern |
Ctrl+A |
Select everything |
Copy to the clipboard
If you want to export a subset of the hexadecimal listing, you can select the instructions you want to copy followed by the shortcut Ctrl+C or the context menu . If you selected bytes in the hexadecimal column, the hexadecimal representation of the data will be put in the clipboard. If it was from the text column, the textual representation will be put in the clipboard.
Additionally, the raw bytes will also be saved into the clipboard using the alternative mimetype application/octet-stream. This way, you can paste the data into another view (or another compatible software) without having to worry if you copied the hexadecimal or textual representation.
Shortcut |
Action |
|---|---|
Ctrl+C |
Copy selected bytes to the clipboard |